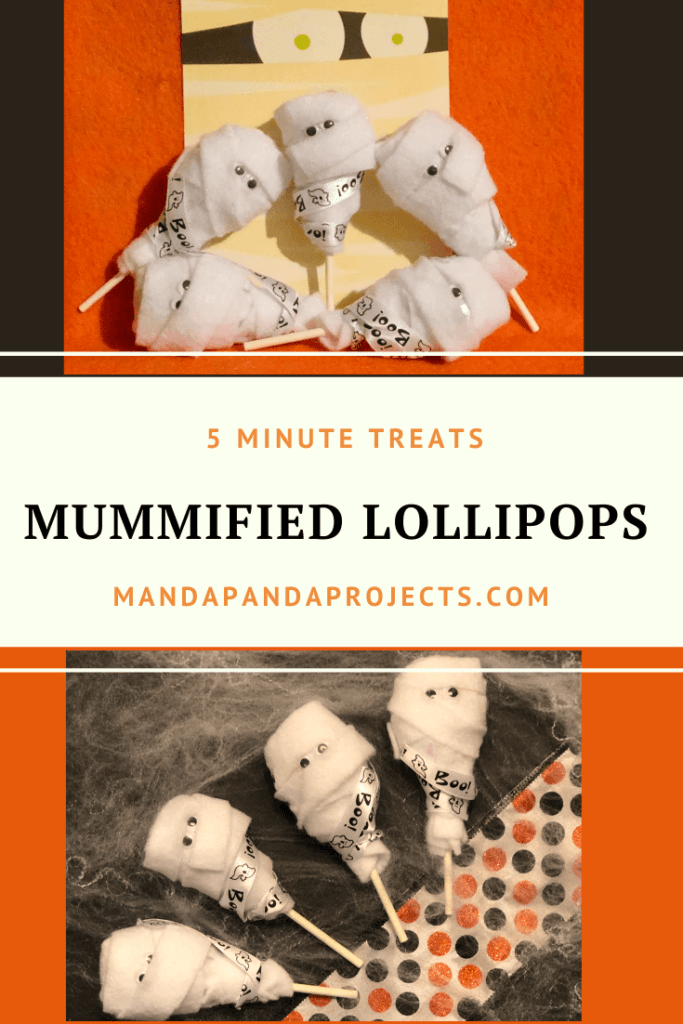
These Mummy Pops are a spooky twist to the traditional coffee filter Ghost Pops that we used to make growing up. They are a perfectly cute treat for the kiddos to bring to their next school Halloween Party. Fun to make….Fun to eat!

I came up with these lil’ Mummies by accident while attempting to make Ghost Pops with felt instead of coffee filters. The felt was too thick to wrap around in one smooth cover, so I cut a piece off in an attempt to wrap and tighten the felt around the lollipop. The result was this bumpy crooked little white oblong shape on a stick- and the Mummified Lollipop was born.
I can’t wait to have the kiddos give these out at their school Halloween party this week. For the level of creativity and crafting I live and breathe on a daily basis, you’d think I’d possess at least a shred of baking skills but, Nooooooooo (not to be confused with my cooking skills- I’m a beast in the kitchen with food food). I’ve finally created my own version of the ever popular Mummy Cake Pops that even I can’t mess up.
After the kids are done begging to eat the lollipops before they are dressed to impress, they’ll have a blast making these cutie pie Mummy’s for all the kids in their class! You can make a whole Mummiful batch, or do as I did and make an entire Halloween Character Lollipop Army!

Thinking of adding a Witch, Zombie, and Vampire to my Army next year!
This post may contain affiliate links for your convenience (which means if you make a purchase after clicking a link I will earn a small commission but it won’t cost you a cent more!)
Supplies Needed to Make Mummy Lollipops
So, to get started on these bad boys you’ll need 5 things:
1. White Felt
2. Googly Eyes
3. Ribbon – black/white/pattern – it’s your choice. (I used white with BOO 👻 words).
4. Glue – E6000 is my go to but Modge Podge would work as well.
5. LOLLIPOPS! Blowpops are the fave in my house.
Of course you’ll need scissors and some sort of paper or covering to protect your work surface. As we know, kids cannot be trusted with glue, scissors, or even felt for that matter!
How to Make Mummy Lollipops
Once you’ve got all your materials, pour yourself a much deserved glass of Mummy Vino and get to crafting!
Start by cutting the white felt into two or three separate sizes.

The first will be the cover of the lollipop and should be about 4-5 inches long and 2 inches wide. Do NOT whip out your tape measure here. That would totally defeat the purpose of this quick and easy, kid friendly project. If you haven’t noticed, Mummies are not exactly the neatest, well put together little creatures.
Next, cut strips to serve as the Mummy “wrap”. I cut most of them the length of the long side of the felt, but did cut some shorter to use if I wasn’t happy with the look after the long piece was wrapped around.
Wrap the larger white felt strip around the lollipop head
Start preserving your lollipop by taking one of the larger felt pieces and folding it over the head of the lollipop leaving one end longer so that it covers about a third of the stick, and the other end wrapped just over the top.

Pinch together one side…

Fold over and hold…

Pinch and fold the other side like so…

And pinch and twist the spare material around the stick. At this point you should have a loosley covered pop that somewhat molds and holds itself in place.

Begin mummifying by taking one of the longer strips and wrapping it around the felt on the stick and up and around the pop itself.

There’s no right or wrong way to do this part, whatever looks Mummirific to you just roll with it! I had to wrap and unwrap a few times on some to get that perfect Mummy appeal but I-AM-CRAZY!
Several times I had to check myself and say, “C’mon man these are a kid treat for your 3rd graders – relax every piece does not need to be strategic and perfect. Please do not pull a me on that one!

When your done with the long wrap you’ll likely have an oblong little guy that is so ugly it’s cute. Here is where you utilize those small strips as cosmetic surgery.

And VIOLA…..!!!

This part is totally optional but it definitely plays to the cute appeal. Take some ribbon and tie a bow around the bottom and wrap it up and around the lollipop head.

Glue on some googly eyes…

And you have got yourself a bon-a-fide Mummy Pop!!
I sent these to my boys school last year and they were super excited to share with their class and their teachers how they made treats for everyone!
So, if your looking for a kiddie treat, having a Halloween Party, or even just feel like being festive and bringing something to share at the office on this spooktacular day- these lil Mummy treats will surely be preserved for years to come!

I am so excited that the ultimate crafting season is right around the corner! I know, I know, it’s only July. But let’s face it, the season starts earlier and earlier each year so let the craft project fun begin!
If you’re looking for some more things to do while we’re all stuck at home with the kiddos, check out my other easy and affordable kids craft ideas!
Until next time…
Stay crafty San Diego!

Love these Halloween Mummy Pops? PIN it for later!


