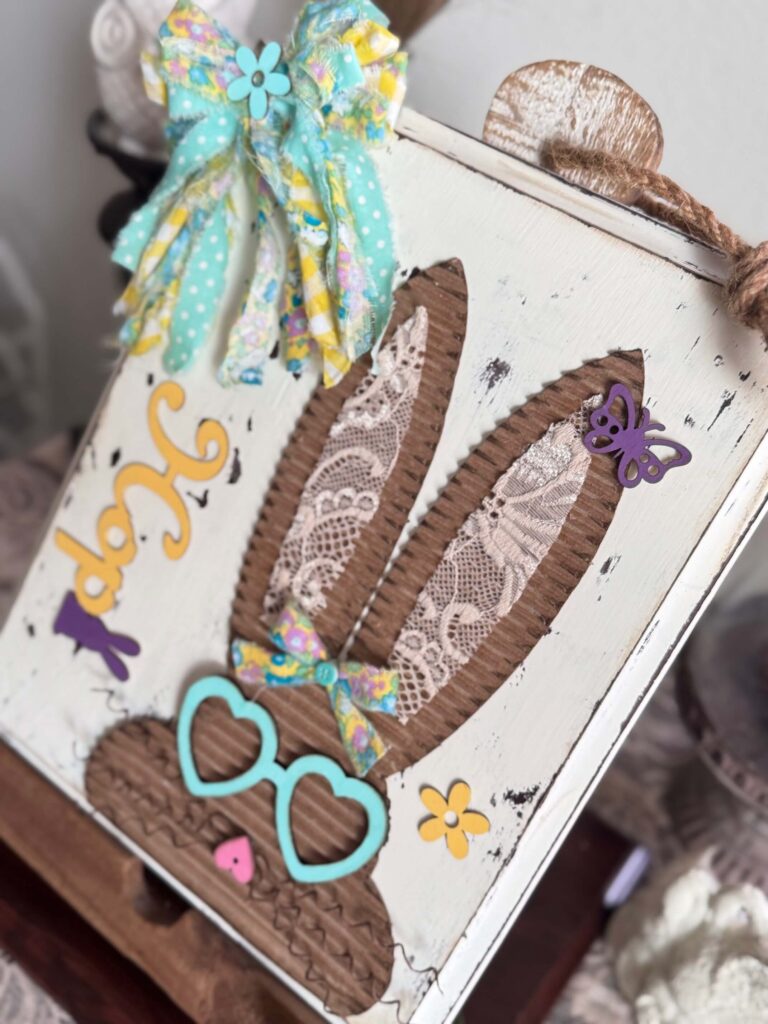
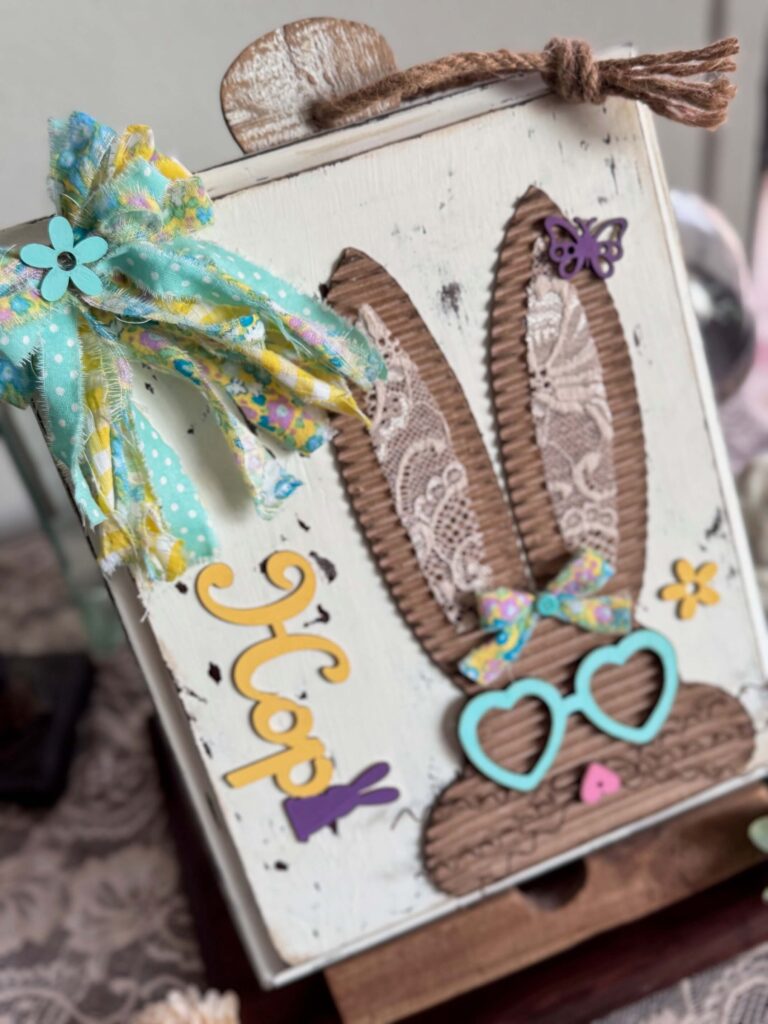
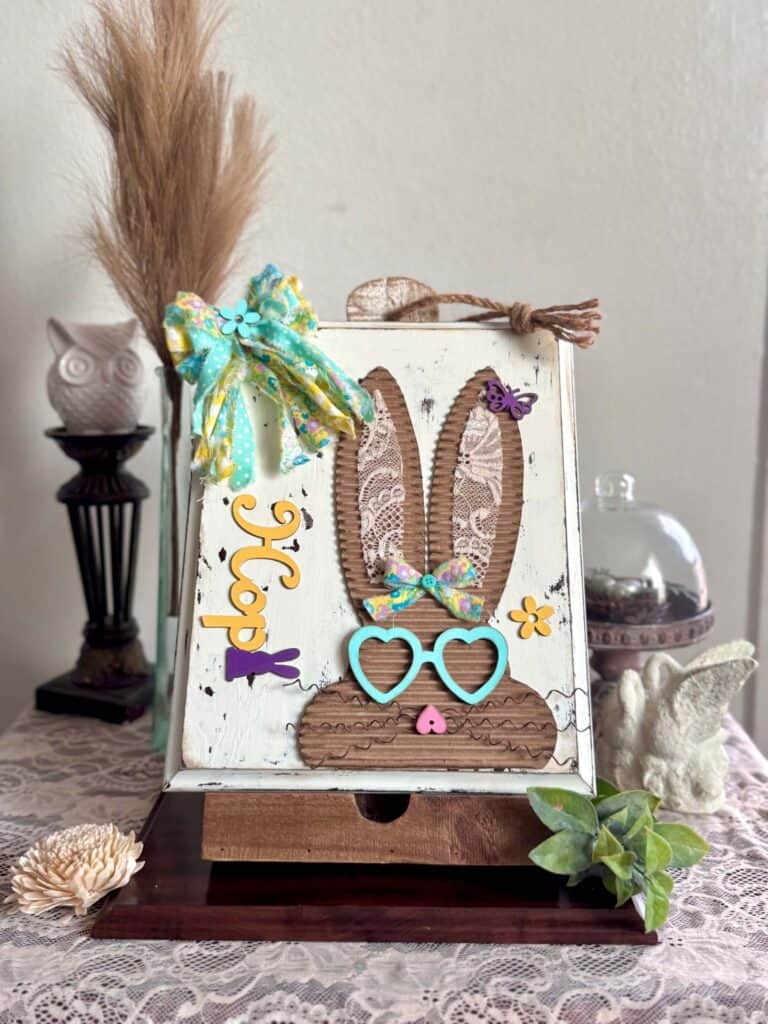
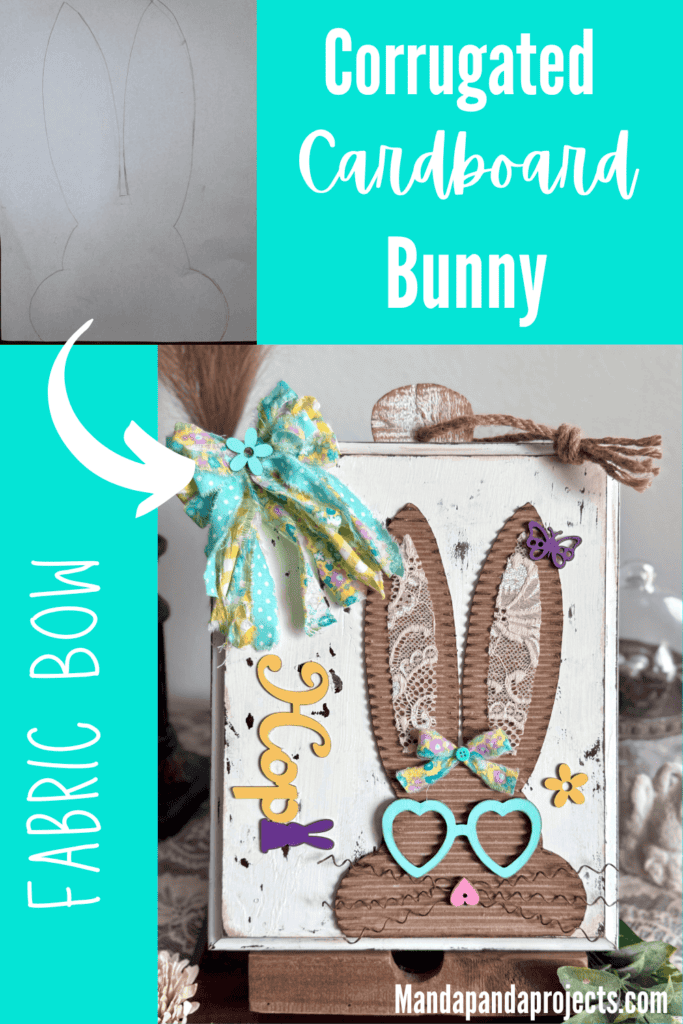
You’ll never look at cardboard the same after seeing this fun Corrugated Cardboard Bunny with a big beautiful messy fabric bow! The perfect addition to your DIY spring and Easter decor!
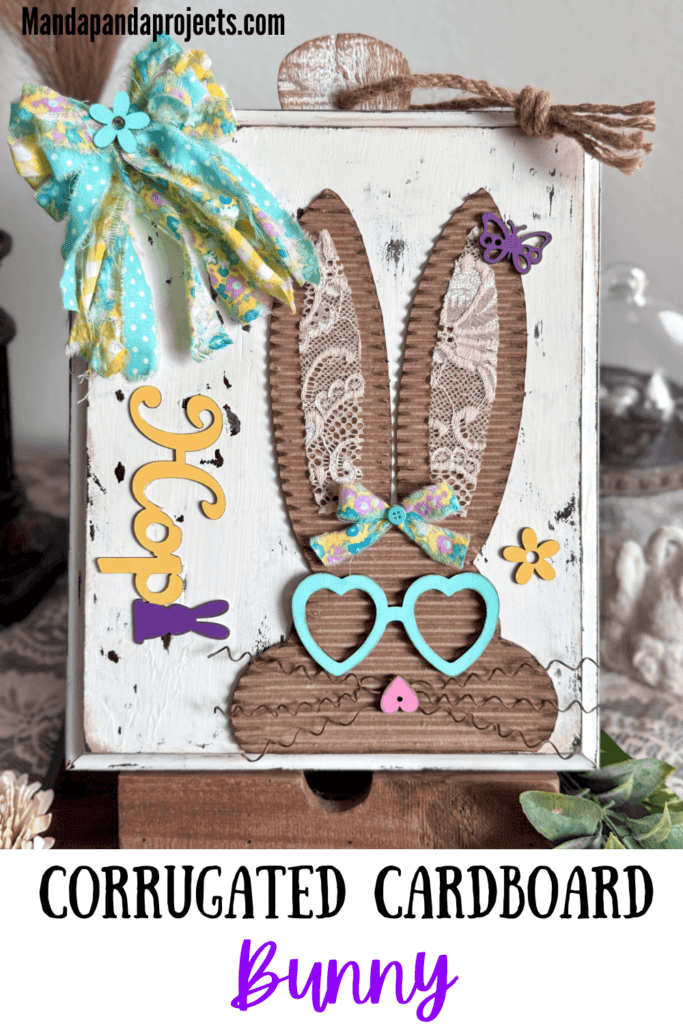
If you have been around for any length of time, you know that I like Big Bows and I cannot lie! Specifically FABRIC bows!
And for this project, the bow is the star of the show! I’m working with FabricWholesaleDirect.com to bring you the cutest little bunny, with the cutest fabric bow!
Given how much I love my bows, of course I said YES when FabricWholesaleDirect.com reached out to work with me.
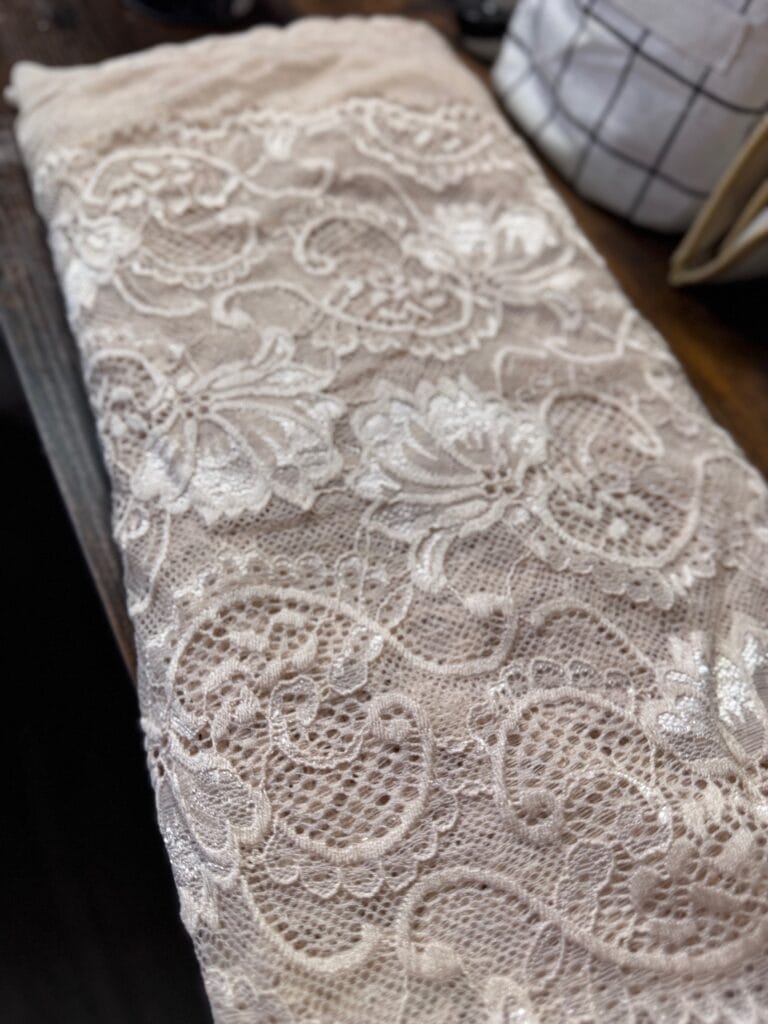
Since it’s February, and it will be springtime before we know it, I was on the hunt for springy type fabric to make this bunny. They supplied me with the fabric of my choice, and I went with Yellow Gingham and Yellow Floral Meadow for my bow, and Victoria Stretch Lace in “Nude” for the bunnies inner ear.
In addition to this project, I even used the lace as a sort of table cover for my picture staging table. How GORG is this lace?
Now of course I chose a typical cotton type fabric for my bow, but I was THOROUGHLY impressed with both their linen and upholstery selections too. When I have the time to take on some bigger projects that require either of these, FactoryWholesaleDirect.com will definitely be my go to for those!
Disclaimer: I was given the opportunity to receive fabric in exchange for this post. However, the opinions on the product, company, and experience are all my own.
Supplies Needed to Make a Corrugated Cardboard Bunny with a Fabric Bow
This post may contain affiliate links for your convenience (which means if you make a purchase after clicking a link I will earn a small commission but it won’t cost you a cent more!)
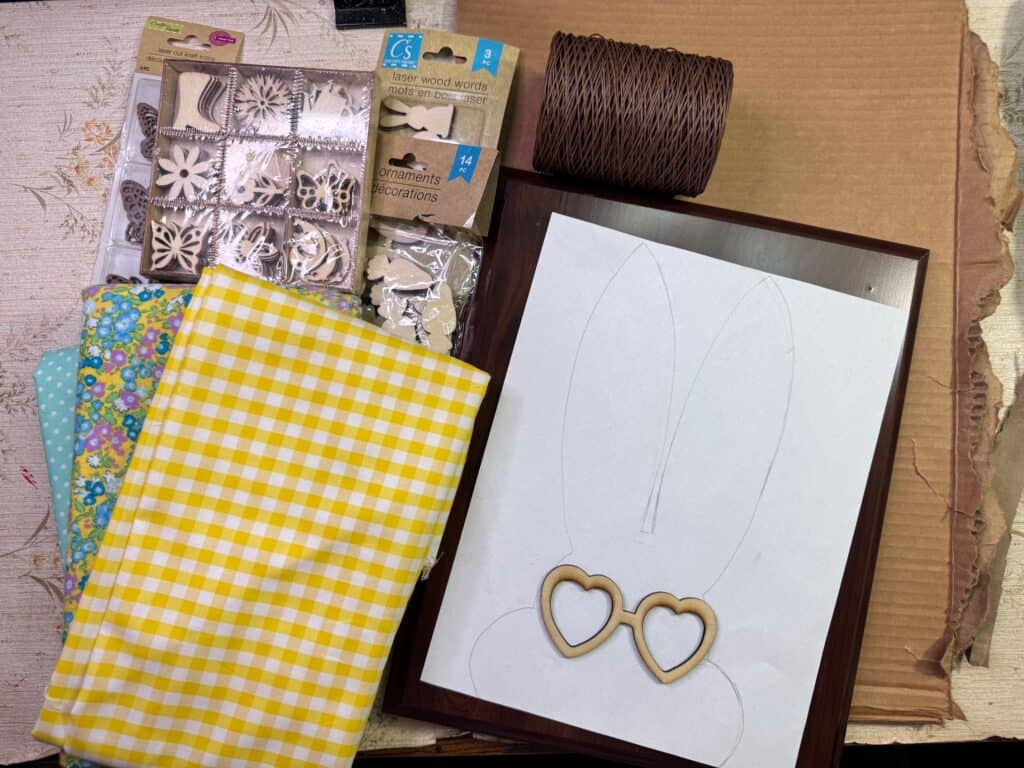
- Wood Plaque
- Cardboard
- Wood heart glasses
- Small wood cutouts: Butterfly, Flower
- Dollar Tree wood hop/bunny
- Yellow Gingham Fabric
- Yellow Floral Meadow Fabric
- Victoria Stretch Lace
- Small wood heart
- Rustic Floral Wire
- Candlewax
- Kilz Dark Wax
- Twine
- Paint: White, Apple Barrel Key West, Sunny Day, and Velvet Crush
- Small Teal button
- Mod Podge
- Hot glue gun
How to Make a Corrugated Cardboard Bunny
I made this Corrugated Cardboard Bunny on video. So you can WATCH the tutorial by clicking below.
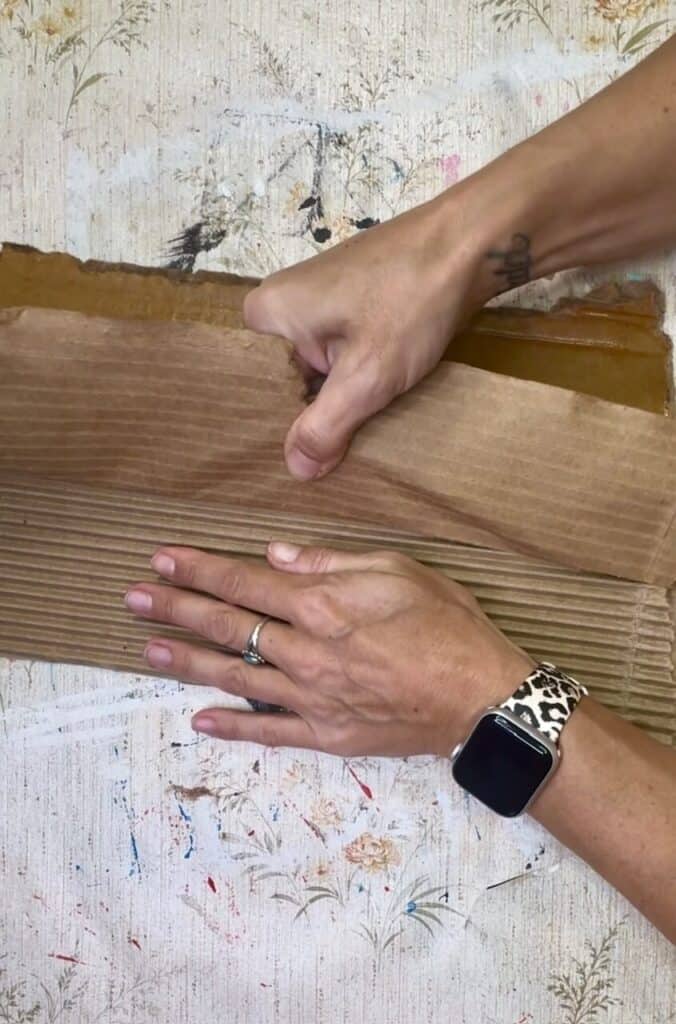
First things first, we have to “corrugate” our cardboard. Yes, you can buy it pre-corrugated, but I know a hack that makes it so easy you won’t have to waste your money. All you do is spray it with a nice good coat of water, rub it into the cardboard, and let it sit for about 2 minutes.
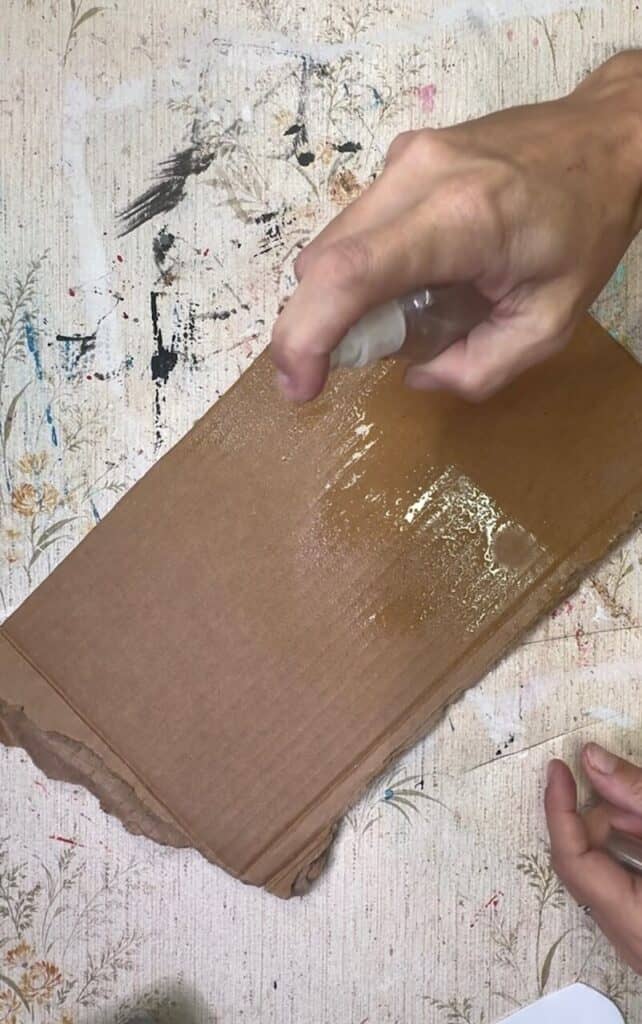
Then, you’ll be able to peel the top layer of the cardboard right off like you see in the picture below.
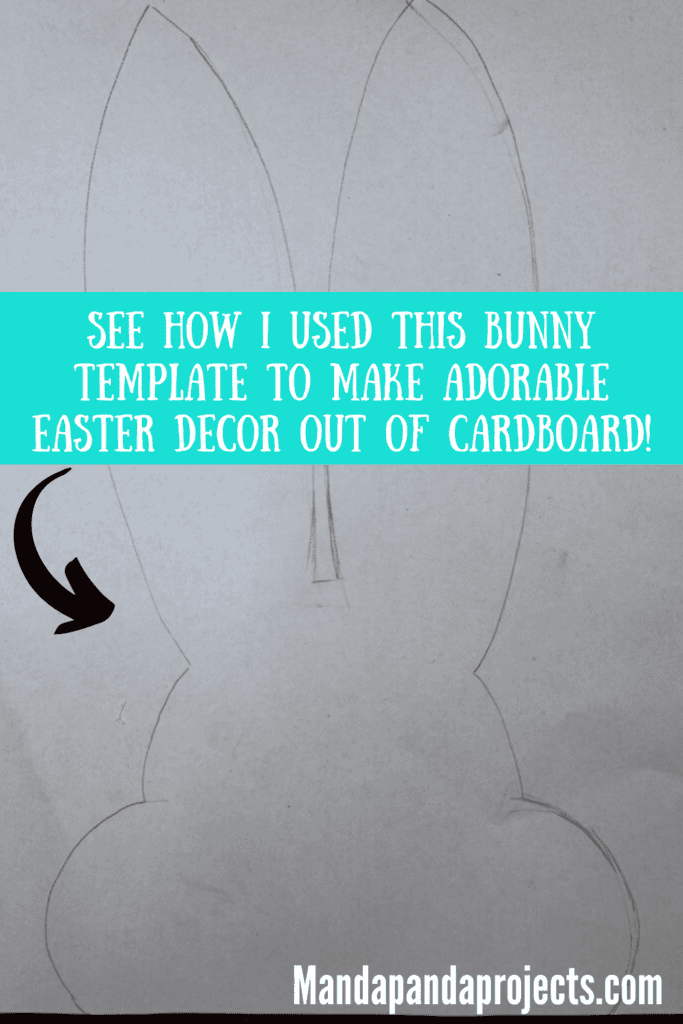
Now our cardboard is ready to be made into a bunny! If you’re thinking “but I can’t hand draw a bunny Amanda”, don’t worry, I got you gurlllllll.
I have a bunny template that I drew for you that you can save and print. Just press and hold the pic below if you’re on mobile (right click and “save image” if on computer), save to your device, and print it out.
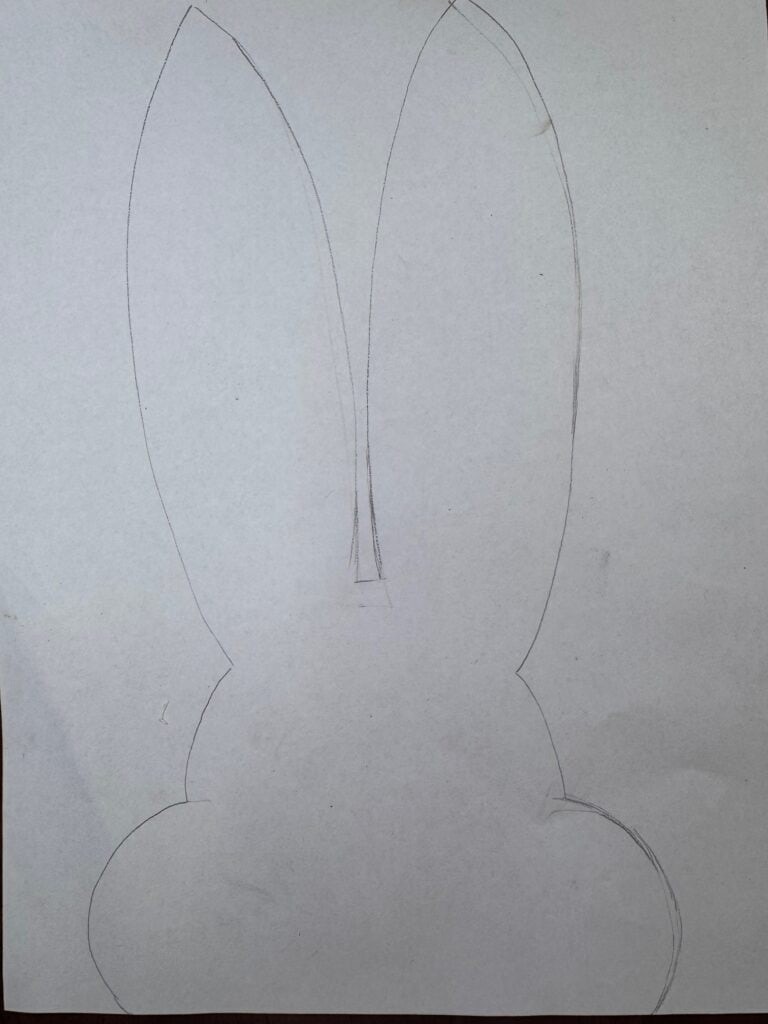
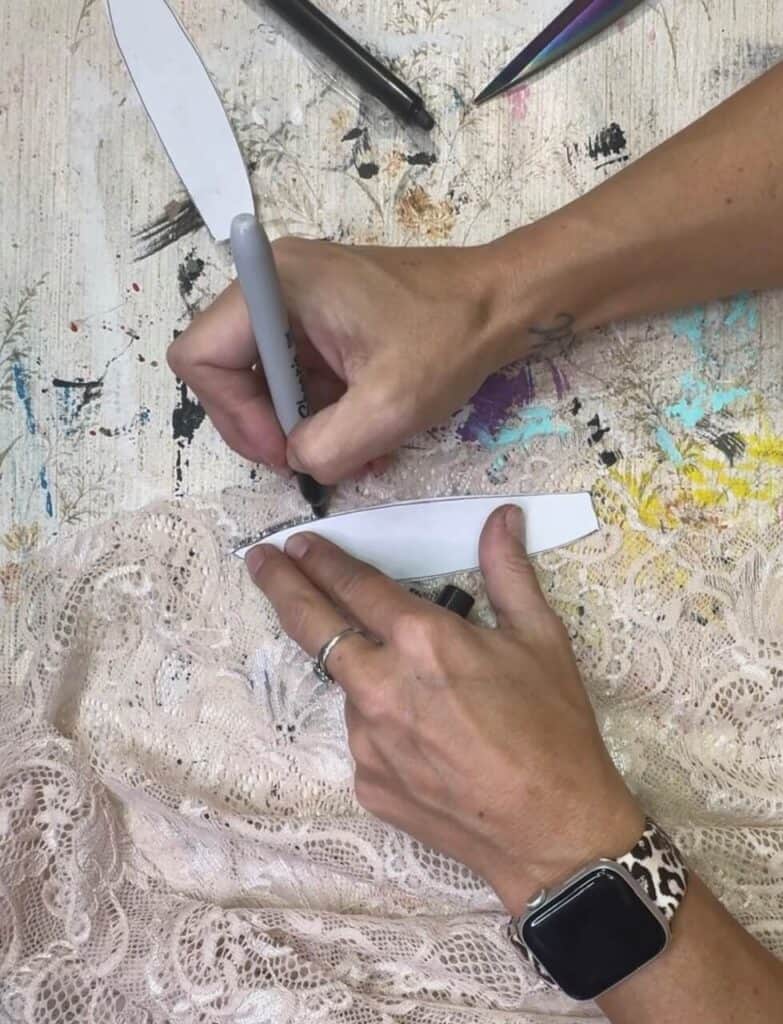
Trace the chubby bunny template onto your corrugated cardboard.
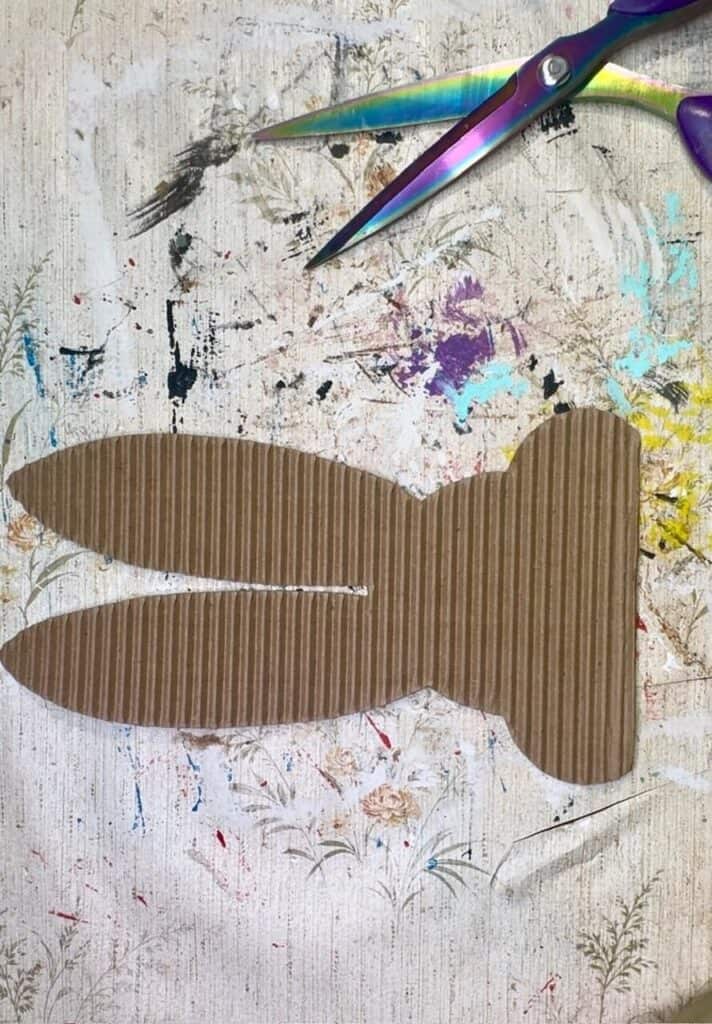
Cut your corrugated cardboard bunny out.
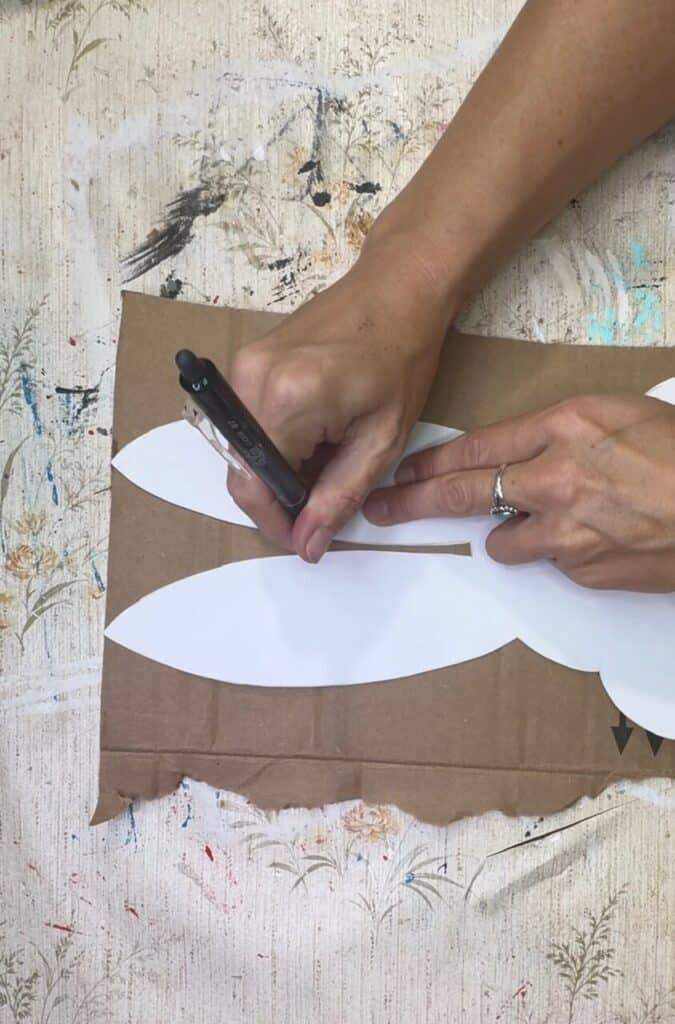
For the inner ears, I made myself a template by drawing the inside portion and cutting that out. You can do this, or you can freehand draw the inner ears.

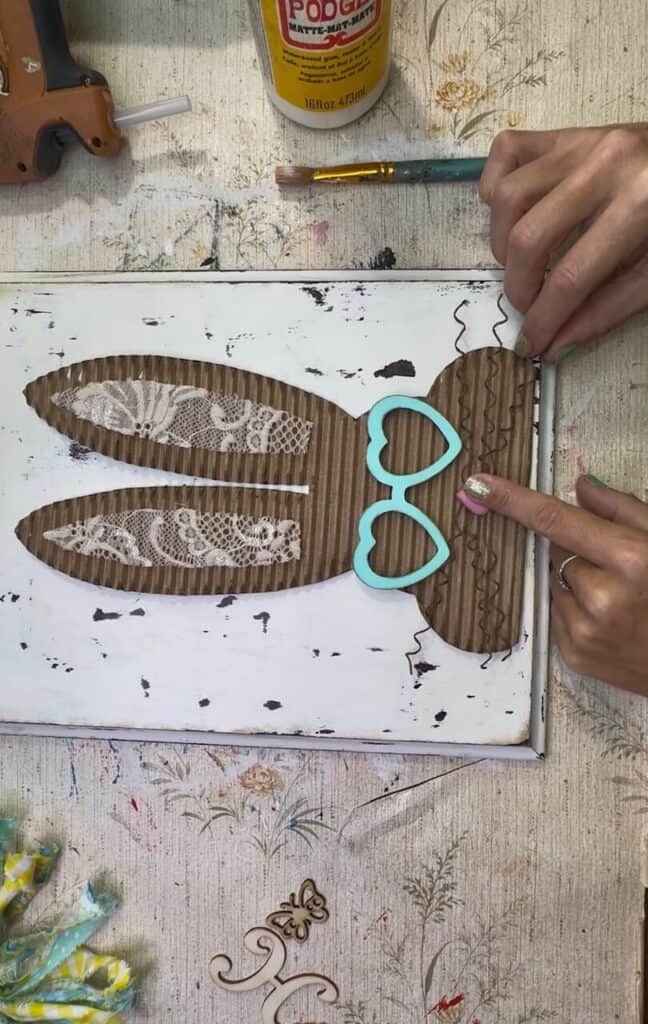
Then trace your “inner ear” template onto the Victoria Stretch Lace from FactoryDirectWholesale.com, and cut that out.
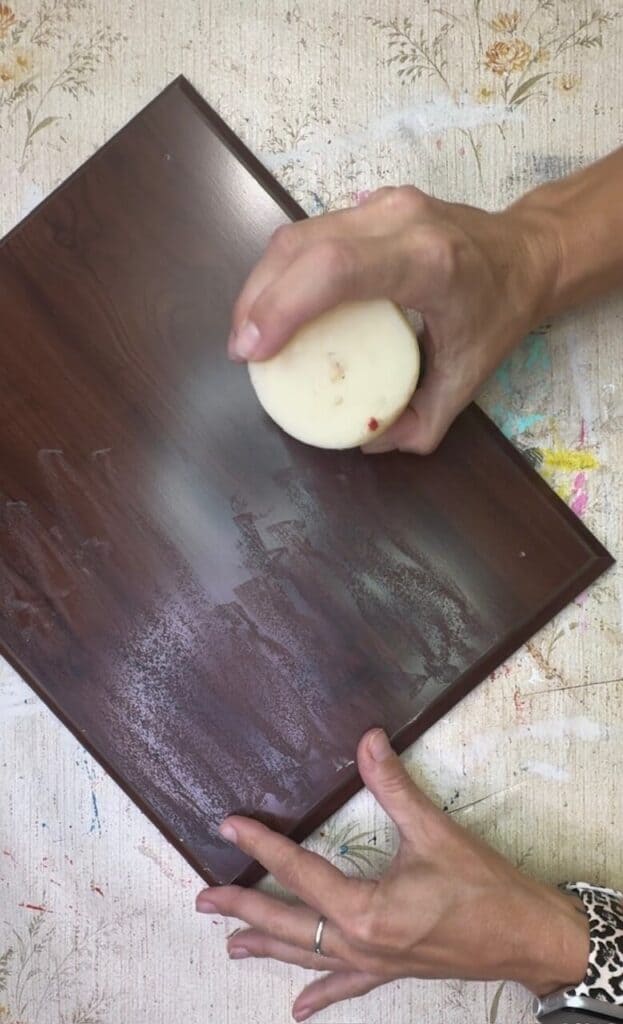
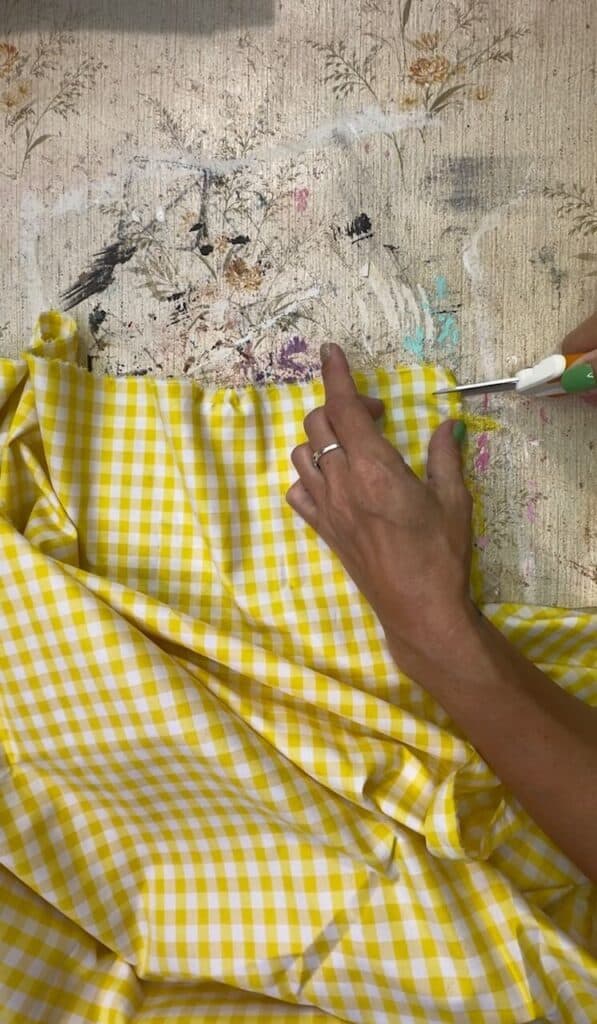
Next, we have to prep our surface. I decided to do mine “chippy”, but you could skip this and paint it plain white if you like.
To “chippy” it, rub the surface with candle wax. The more wax you rub on, the more it will “chip”.
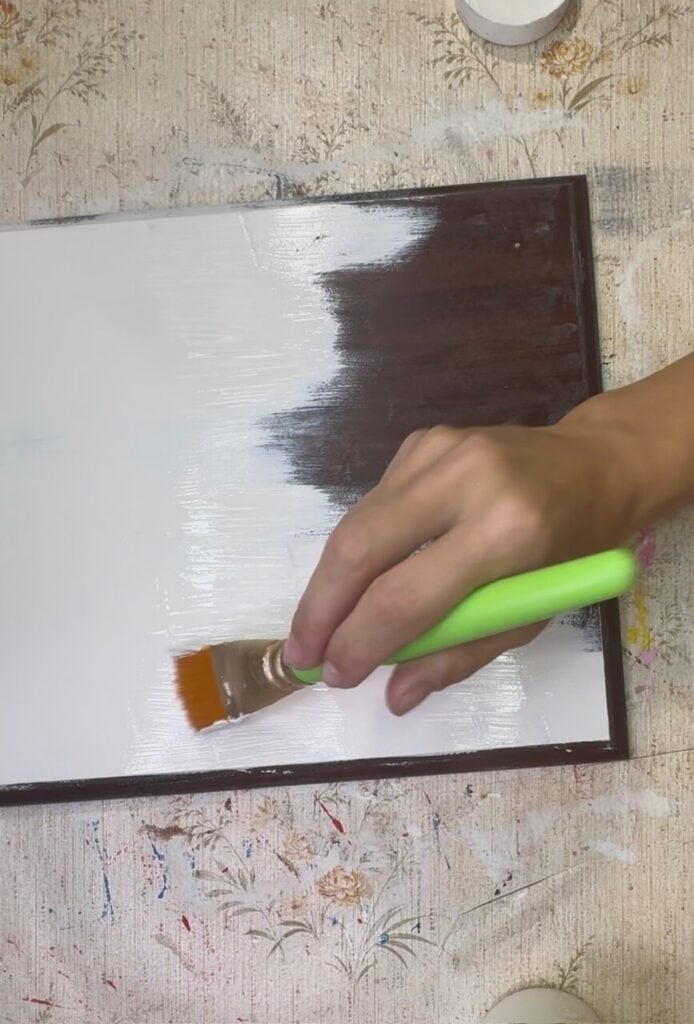
Paint the entire wood surface all white, right over the top of the wax.
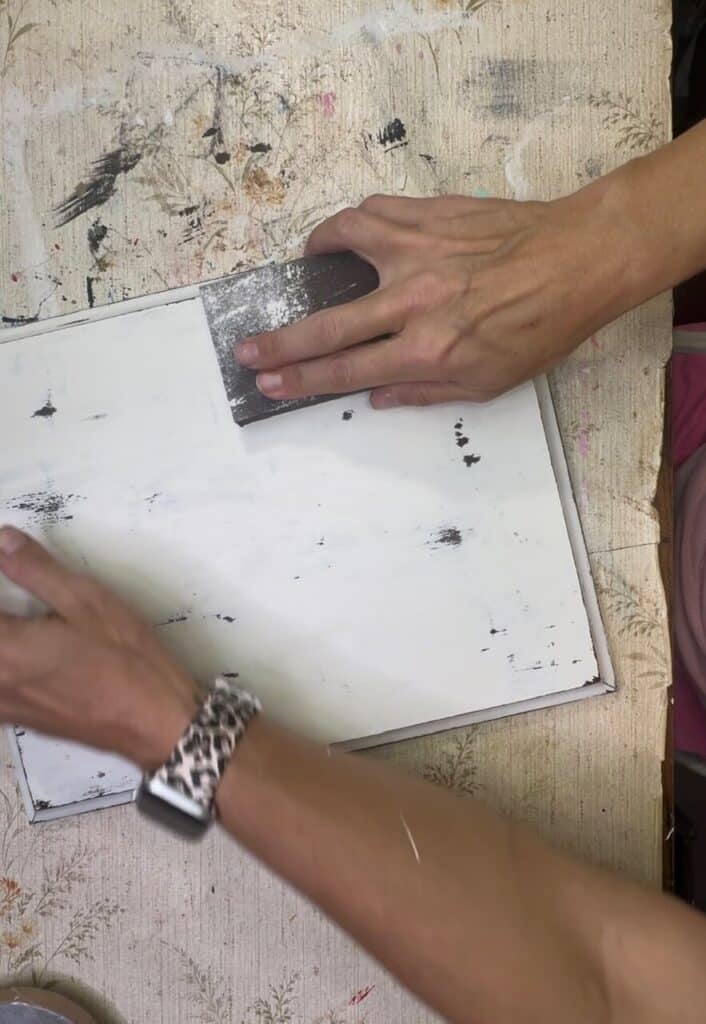
After it’s completely dry, “chip” it using a sanding sponge. You can also use a paint scraper for a heavier chipped look. I wanted mine to be more lightly distressed, so I stuck with the sanding sponge.
Next, I did a little bit of distressing to the bunny and the surface using my Kilz Dark Wax. This is another step you could skip if you wanted to, but I like to add it to give it some depth and dimension.
I like to use a finger dauber to rub the dark wax all around the edges of the cardboard bunny.
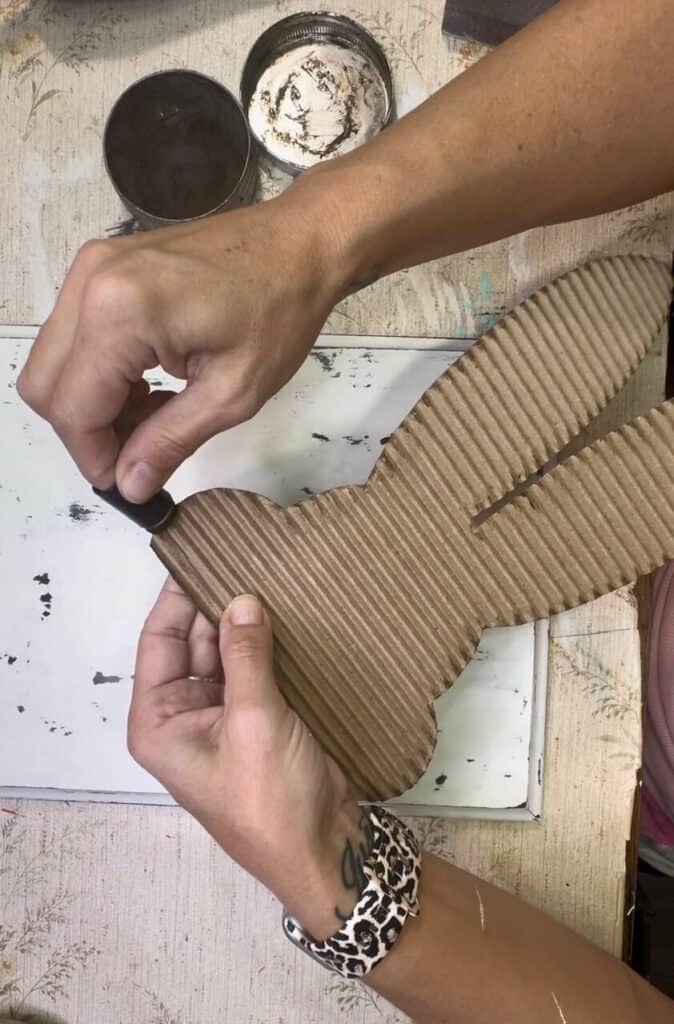
And all around the edges of the wood plaque surface.

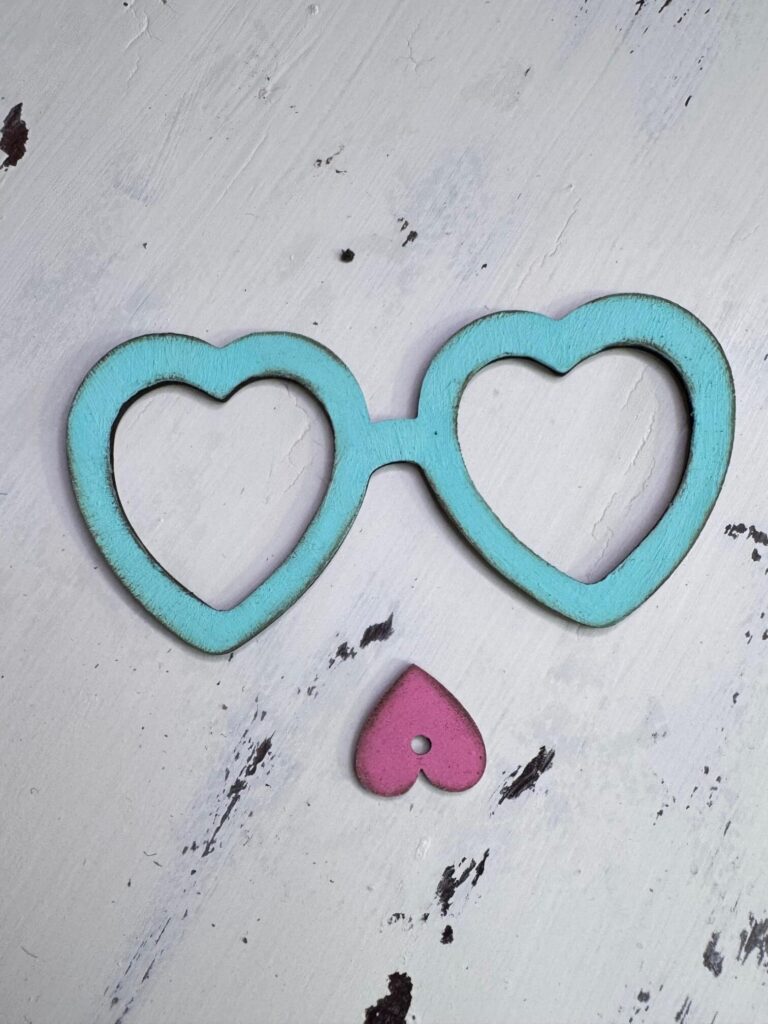
Next, paint your wood eyeglasses a Teal color. This will coordinate with the fabric we are using in the bow.
Paint the small wood heart nose with a light pink color. I added a bit of the dark wax to the glasses and nose as well.
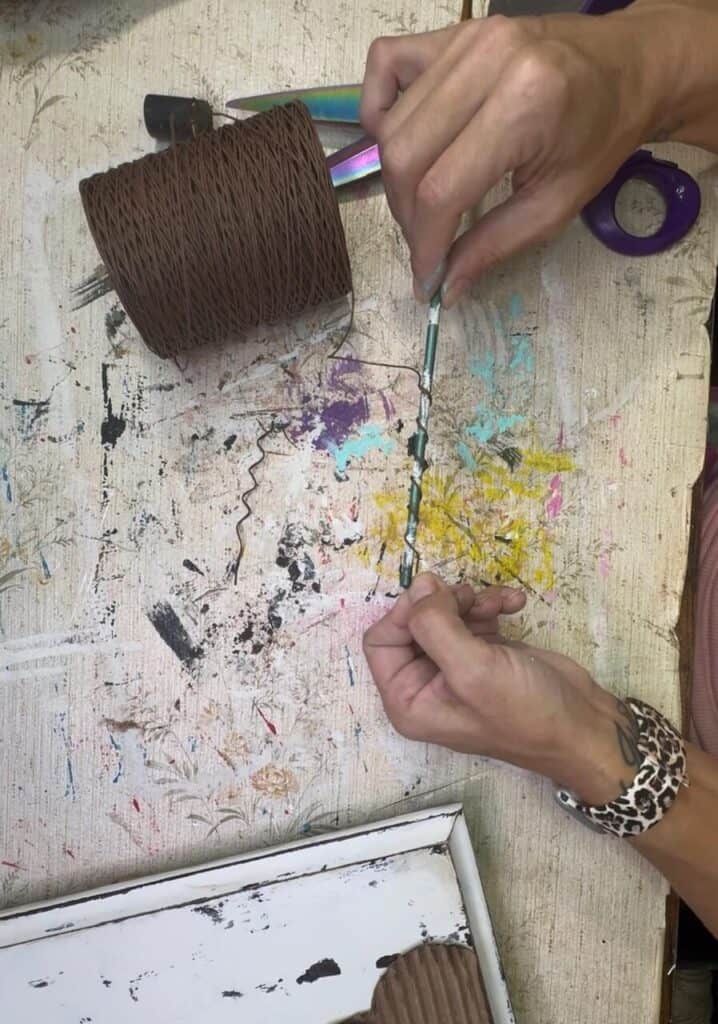
For the whiskers, take a paint brush and wrap the rustic floral wire around it to give it a curly look. You will need 6 of these total, about 4″ long.
Now for my FAVE part…the messy fabric bow! You can make a bow out of fabric, ribbon, or a combination of the two. But as soon as I got this fabric from FabricWholesaleDirect.com, I knew right away it was going to make the perfect bow for this little corrugated cardboard bunny!
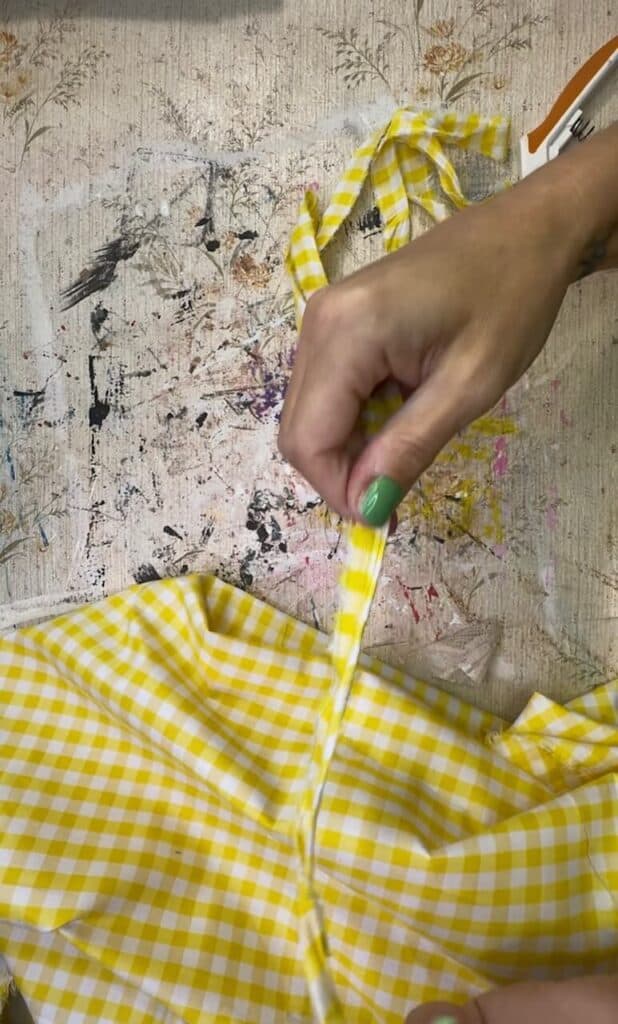
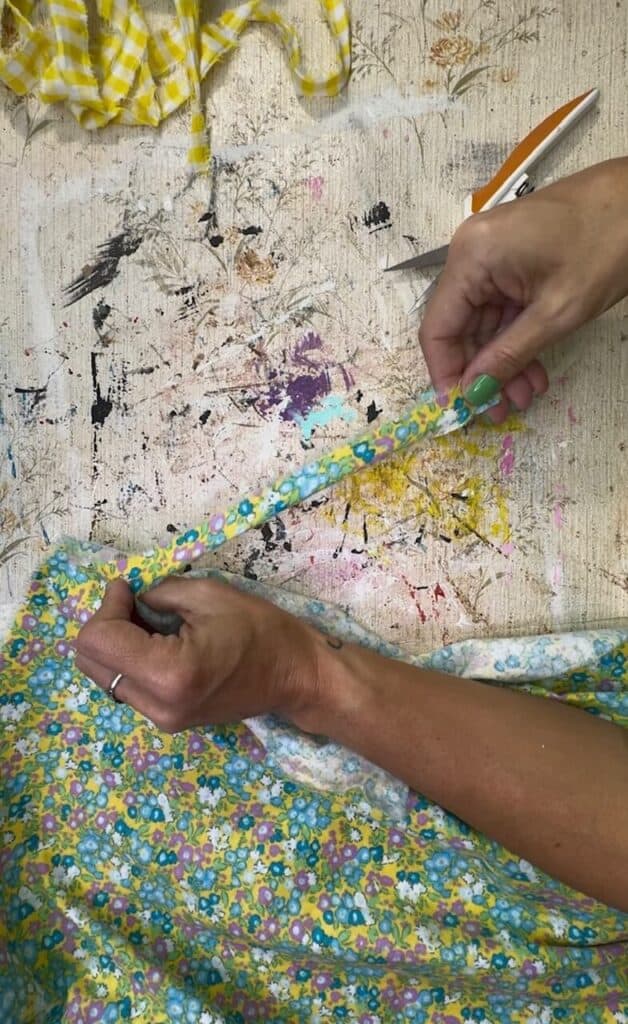
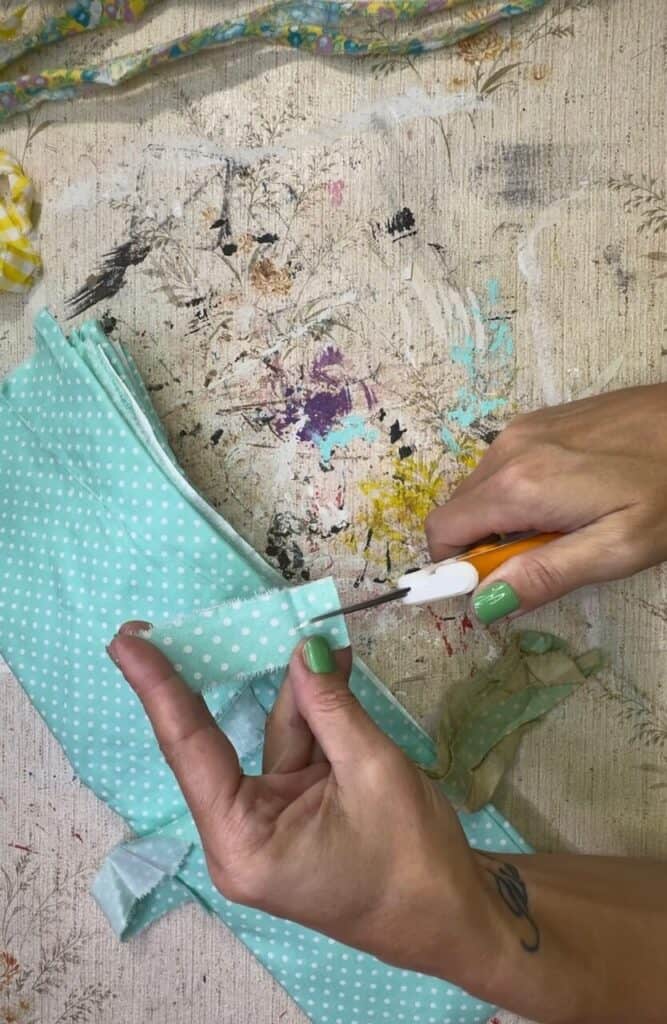
I like to rip my fabric into strips, by cutting a small slit at the end and then tearing it straight down.
For this bow, I made my strips about a half inch wide.
I use three different patterns for this bow, a yellow gingham from FabricWholesaleDirect.com…….
A yellow “floral meadow” with purple and teal flowers from FactoryDirectWholesale.com….
And a teal with white polka dots from my stash.
I used my Bowdabra to make my messy fabric bow, but you totally don’t NEED a bow maker, you can make any type of bow you want.
To use the bowdabra, you just layer the strips of ribbon in a bow formation, one after the other (make sure to put a piece of twine in first). I started with my floral meadow.
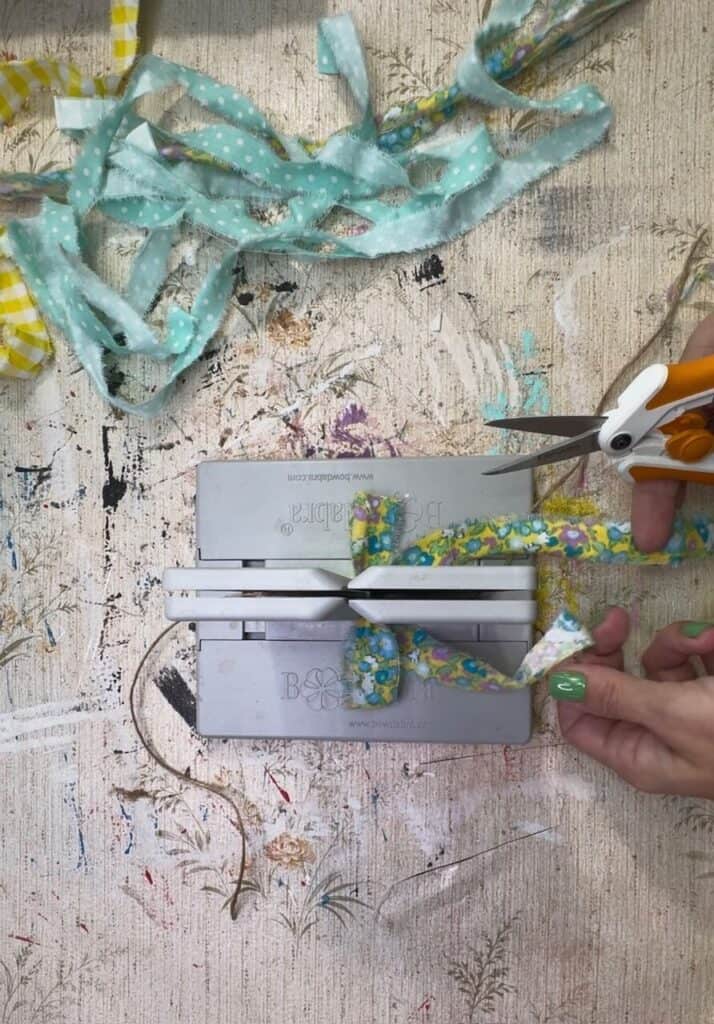
Then added the yellow gingham.
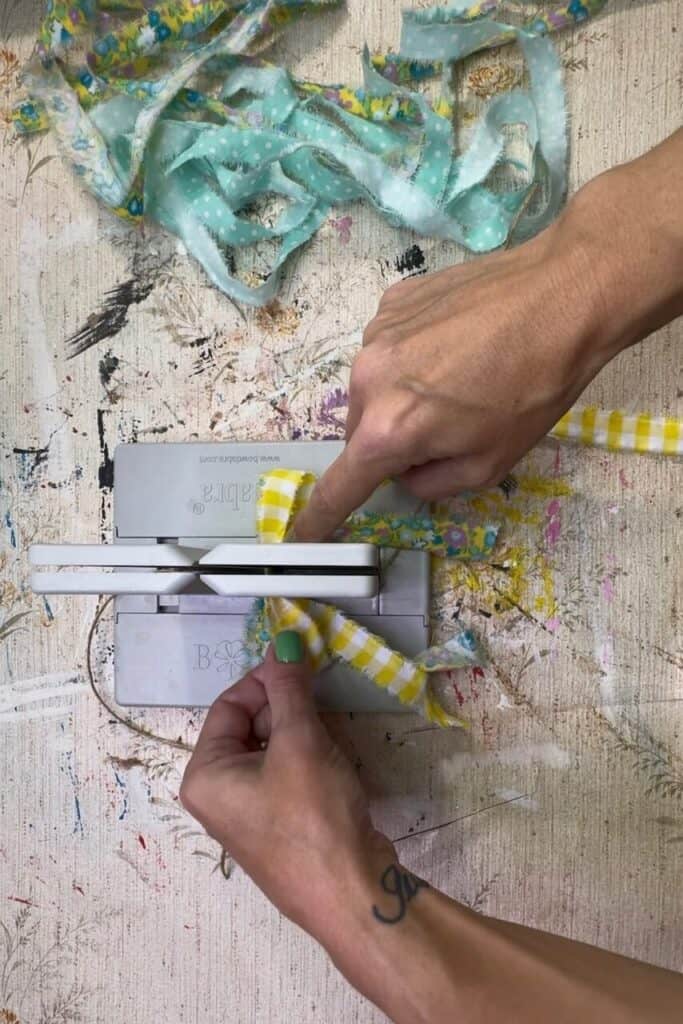
Then the teal polka dot.
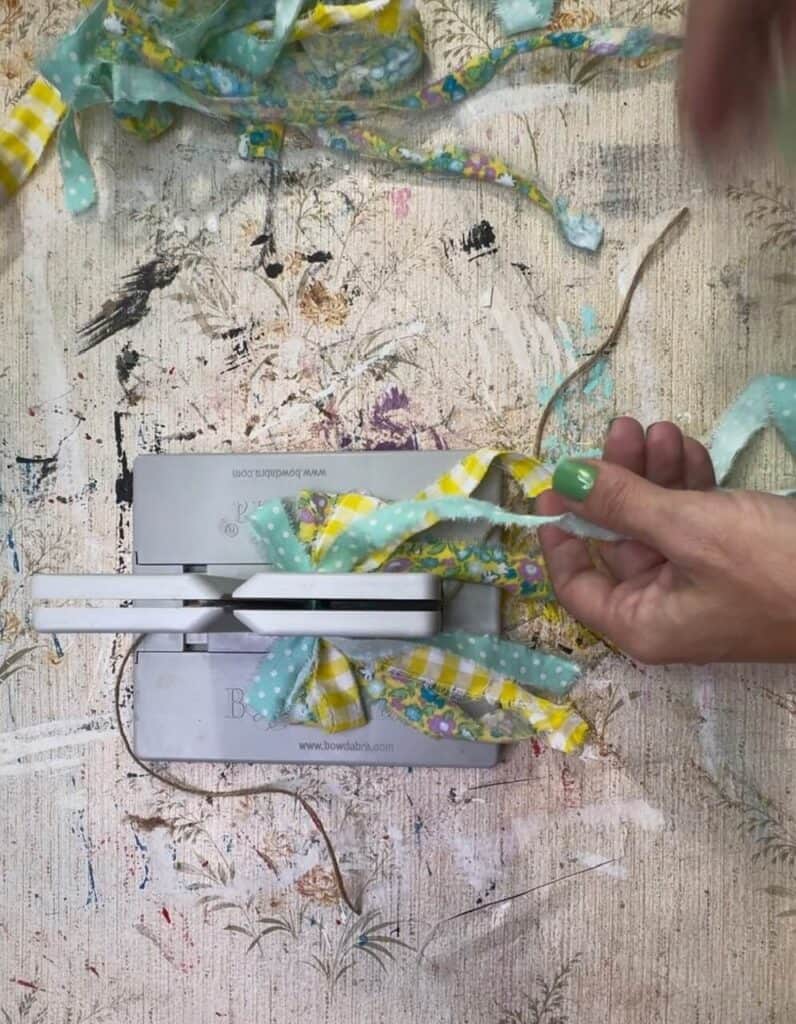
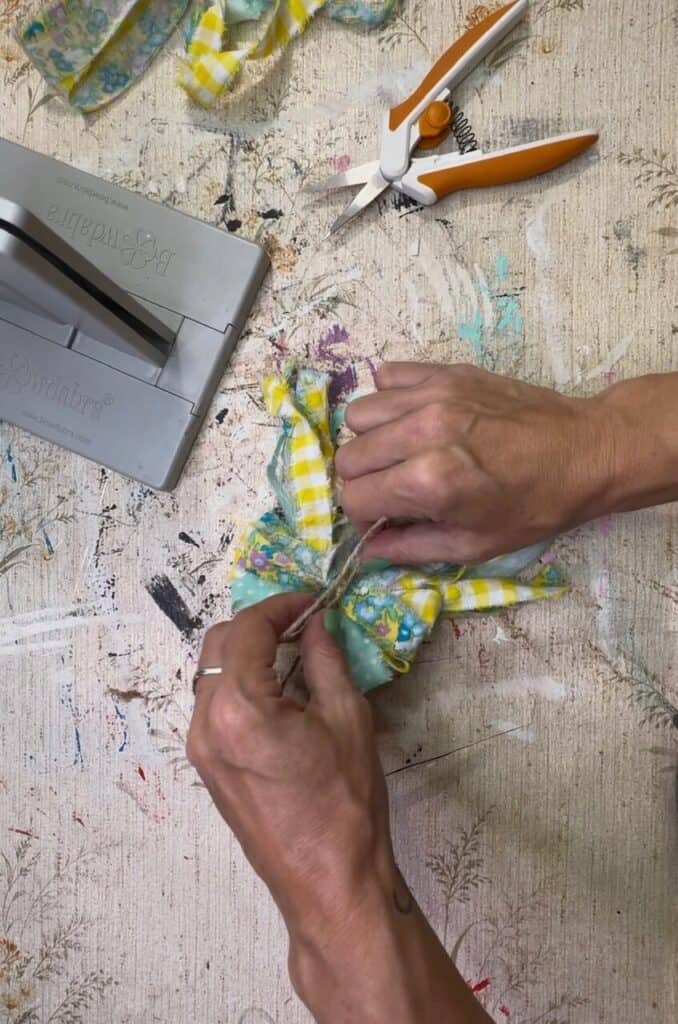
After doing several layers, you just tie your bow off with the twine.
Now let’s put this lil’ bunny together!
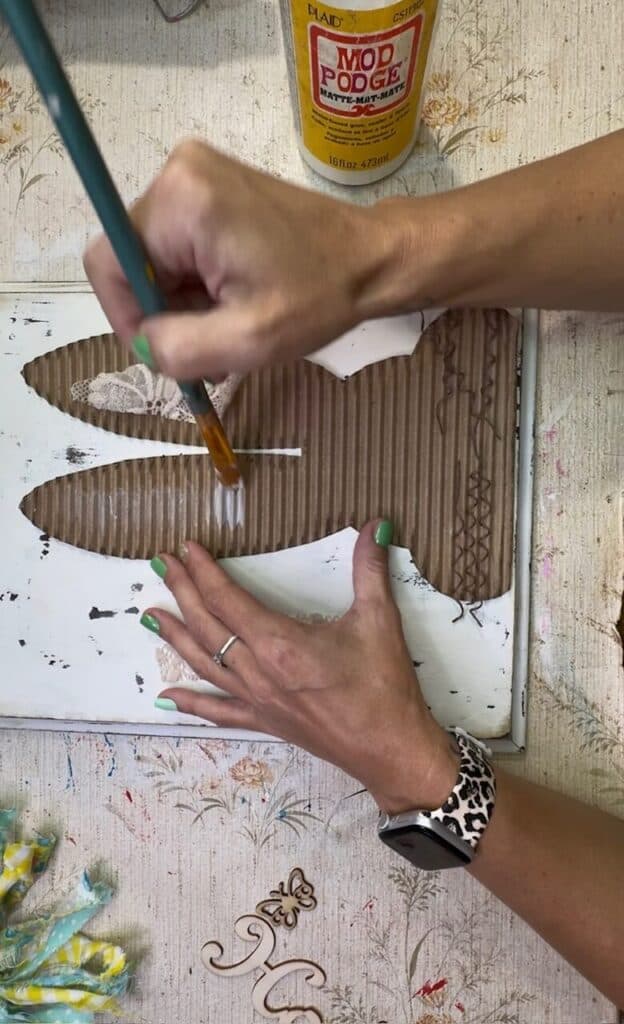
Attach your lace to the inner ears using Mod Podge.
Then hot glue the floral wire whiskers under the pink heart nose, and the wood eyeglasses on top.
I made one other small shoestring bow with the Floral Meadow fabric and hot glued that to the bottom of the bunnies ears for extra cuteness.

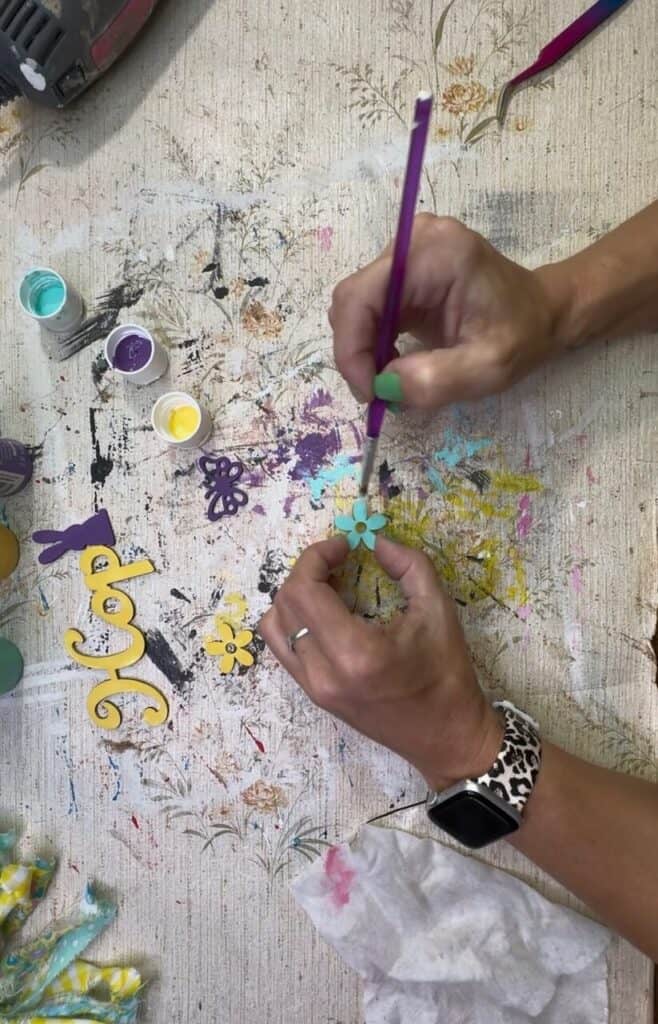
For some extra embellishments, paint a teal flower, a purple butterfly, and a yellow/purple HOP from Dollar Tree.
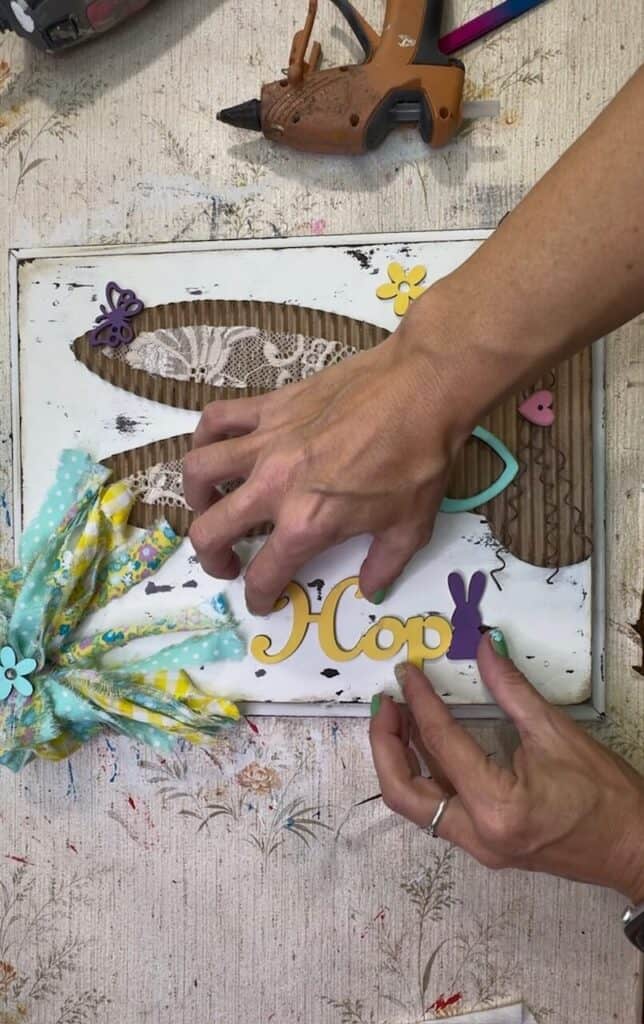
Next, hot glue the entire corrugated bunny to the wood plaque, just off to the right hand side.
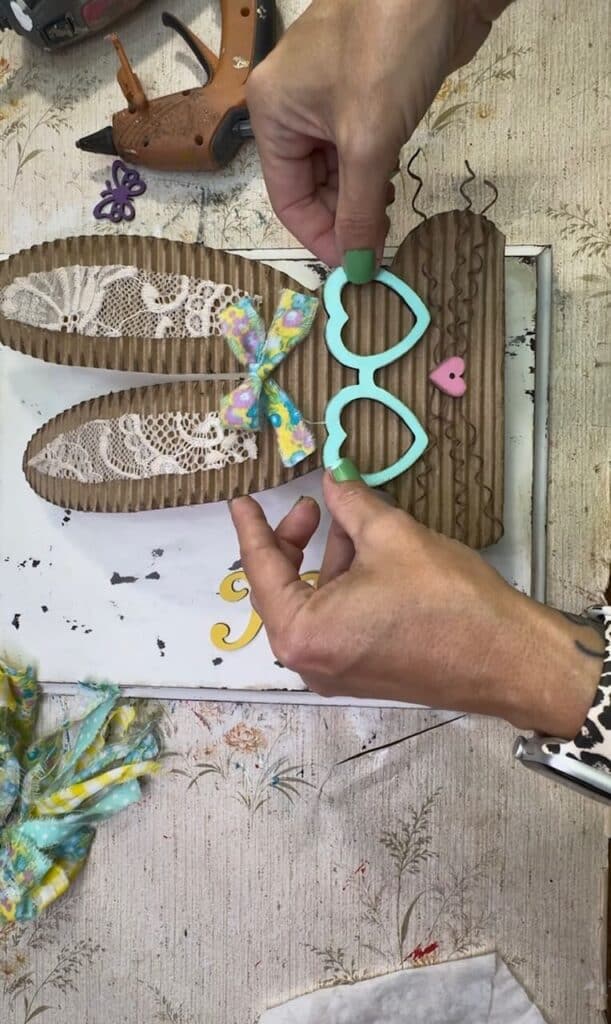
Then glue the bow to the top left side, with a teal wood flower in the center.
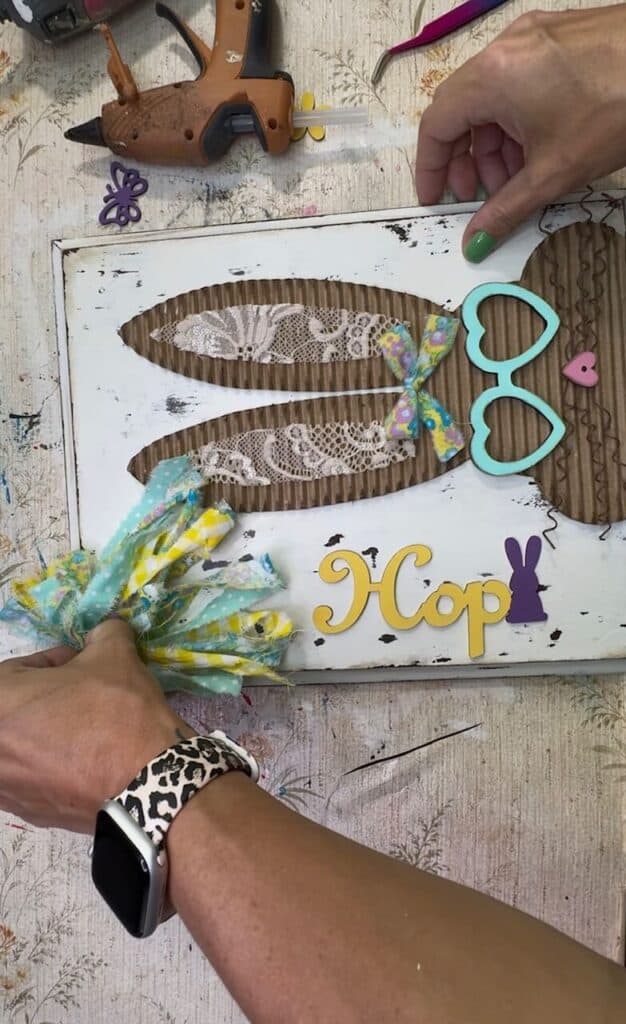
Glue the butterfly to the top of the bunnies right ear.
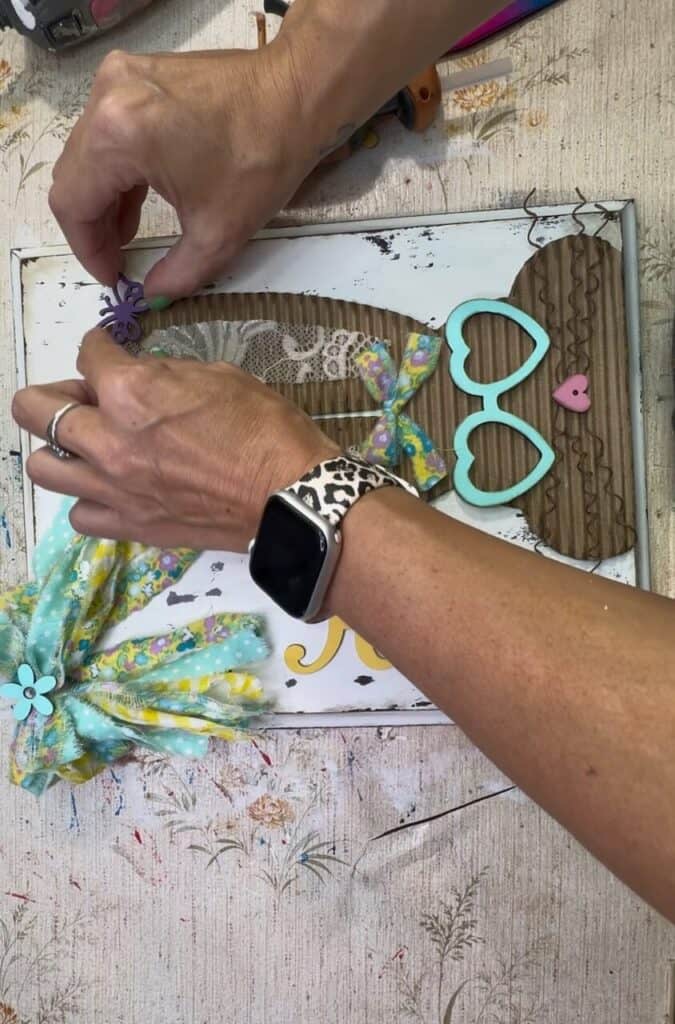
Glue the yellow flower off to the right side of the glasses.
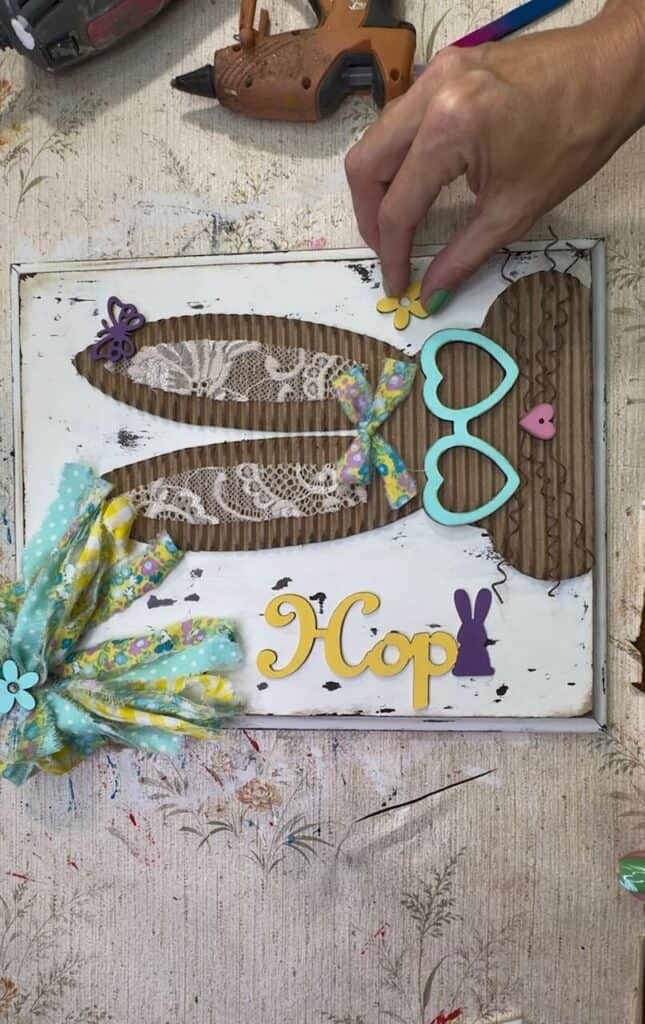
And last but not least, glue the HOP over to the left side of the bunny.
Here she is in all her glory!
The cutest Corrugated Cardboard Bunny that you ever did see.

If you need some more Bunny Inspo, this rustic Bunny decor is one of my faves! A different style from this lil’ girl, but adorable nonetheless.
Are you going to make a Corrugated Cardboard Bunny for Easter or Spring? If you do, I’d love to see it! Pop on over to our free Craftspiration Facebook group, and join in on the fun by posting a pic of your Tiered Trays, DIY’s and crafts. I just love to see all your creative and crafty creations.
If you’ve got a million projects on your crafting ‘to-do’ list like I do, than you need my FREE Craft Project Planner so you can plan to make *all the things*! When you sign up for the craft planner, I’ll also send you lot’s of fun, easy, and budget friendly ideas for you to fill it up with!
Free printable Craft Project Planner
Get organized, get inspired, and get crafting, with our free Craft Project Planner!
Until Next Time…
Stay Crafty San Diego!
Love this Corrugated Cardboard Bunny with Fabric Bow? Make sure to PIN it for later!


March 3, 2025 @ 8:59 am
I absolutely love this Amanda! It’s so cute! I definitely have to check out the fabric from them too.
March 3, 2025 @ 9:10 am
This corrugated cardboard bunny is Adorable! I love the spring fabrics you used in the bow- yellow gingham, teal polkadot and yellow, purple, teal Meadow floral-so stinking cute. I also noted how you traced the bunny template to the flats side of the cardboard- genius!!! Love this so much!!!
March 3, 2025 @ 9:17 am
This simple bunny craft is absolutely adorable! Cardboard & beautiful fabrics for the win!
March 3, 2025 @ 9:41 am
What an adorable cutie patootie cardboard bunny. The fabric was very nice. Im going to check out Factory Direct Warehouse…..you can never have enough fabric.
March 3, 2025 @ 9:54 am
This is so stinkin cute. Love the color choice!! I spread the honey to my group for you!!
March 3, 2025 @ 10:06 am
Very beautiful!
March 3, 2025 @ 10:39 am
Love love love 🐰 you’re so inspiring!
March 3, 2025 @ 11:33 am
The bunny is adorable. The glasses make it. Love corrugated cardboard crafts as well. The material for the joe is adorable.
March 3, 2025 @ 7:15 pm
Love it ! I’m new to crafting ! Keeps me busy and mind off cancer treatment
March 3, 2025 @ 11:04 pm
I love love love ❤️ the bunny 🐰. The bow need i say more!
March 4, 2025 @ 1:31 pm
How adorable!! Love BUNNIES! 🐰💓
March 18, 2025 @ 9:04 am
❤️❤️❤️